
In this blog post we are going to show you how we can use the API Clients created for IP Fabric and NAGIOS. We are going to work on a simple scenario where we want to create hosts discovered by IP Fabric into NAGIOS XI.
There are already a few blogs on how to use IP Fabric’s API, so today we’re going to focus on using the API clients, which have been created to simplify interaction and data collection.
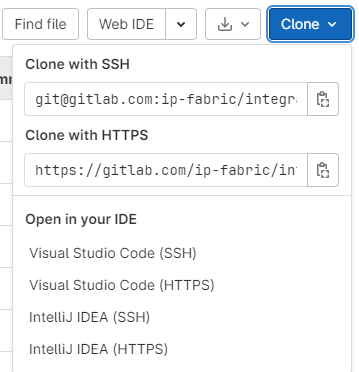
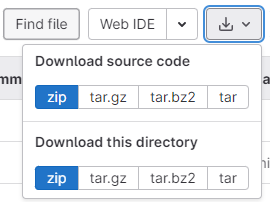
First, you need to download the code in our GitLab repository: 2021-08-30-ipfabric-nagios-api-integration using your preferred method:
Cloning:
Download:
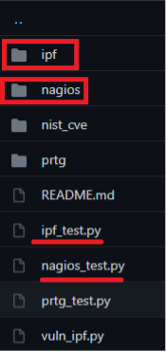
Inside the api_clients folder, you will see the existing API clients. We will have a look at ipf and nagios, to understand how to use them.
Before looking at each API client, we need to define some requirements to ensure everything will work as expected.
For this blog post, I will be using iPython for its powerful interactive shell, but you can use Python3. To use the Nagios and IPF api client, you need to install the HTTPX library, and we would recommend using the rich library as well.
How to install iPython:
seb@IPF_vDEMO$ pip install ipython
How to install httpx and rich libraries:
seb@IPF_vDEMO$ pip install httpx rich
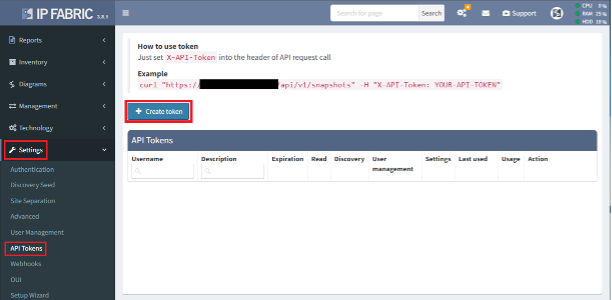
To start using the API Client, you need to provide the information regarding the IP Fabric server and the token.
To create the token on IP Fabric, go to Settings/API Tokens and create a new token:
You need to create environment variables:
seb@IPF_vDEMO$ export IPF_URL="https://ipfabric.server/"
seb@IPF_vDEMO$ export IPF_TOKEN="123qwe45ert67tyui"
We can now run ipython to create the IP Fabric client:
seb@IPF_vDEMO$ ipython
Python 3.8.5 (default, May 27 2021, 13:30:53)
Type 'copyright', 'credits' or 'license' for more information
IPython 7.25.0 -- An enhanced Interactive Python. Type '?' for help.
Let’s explore the IPFClient class, which will interact with the IP Fabric server.
In [1]: from ipf.ipf_api_client import IPFClient, IPFDevice
In [2]: from rich import print
In [3]: ipf=IPFClient()
The Class ipf will be created using the environment variables you created above. To confirm it has worked correctly, you can look at the list of snapshots. This will confirm that we have access to the data from the IP Fabric server:
In [5]: ipf.snapshot_list()
Out[5]:
[{'index': 0,
'id': '50ac77c2-8be4-495b-b0ef-ea2a75bfa21c',
'name': None,
'count': 682,
'state': 'loaded'},
[…]
{'index': 18,
'id': 'e9a5504b-1592-4c74-a84f-5188f99a9283',
'name': 'Demo day 1 - 202106 (clone)',
'count': 678,
'state': 'unloaded'}]
In [6]:
At the time of writing, this is the list of functions you can use within the IPFClient class:
You can now assign a device to a variable which will allow you to access information for that specific device (IP address, hostname, site…)
In [6]: d = IPFDevice("L38EXR1")
In [7]: print(d.hostname+"|"+d.ipaddr)
L38EXR1|10.38.255.101
This concludes the overview of the IPF API client. Before showing a more specific example on how to use it, we will look at the Nagios XI API client.
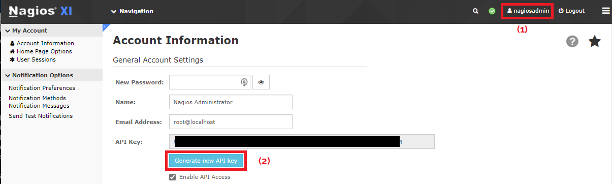
Just like we did with IP Fabric, we need to ensure we have a valid token to use the Nagios XI API. To proceed, you need to go to your account setting (1) and generate an API key (2):
You also need to create the environment variables related to Nagios:
seb@IPF_vDEMO$ export NAGIOS_URL="https://nagios.server"
seb@IPF_vDEMO$ export NAGIOS_TOKEN="0987lkj76uyt54fds"
We can now run ipython to create the NAGIOS XI API client:
seb@IPF_vDEMO$ ipython
Python 3.8.5 (default, May 27 2021, 13:30:53)
Type 'copyright', 'credits' or 'license' for more information
IPython 7.25.0 -- An enhanced Interactive Python. Type '?' for help.
Let’s explore the NAGIOSClient class, which will interact with the NAGIOS server.
In [1]: from ipf.ipf_api_client import IPFDevice, IPFClient
...: from nagios.nagios_api_client import NAGIOSSensor, NAGIOSClient
In [2]: nagios = NAGIOSClient()
The Class nagios will be created using the environment variables you created above. To confirm it has worked correctly, you can look at the list of existing hosts. This will confirm that we have access to Nagios’ data:
In [3]: nagios.host_list()
Out[3]:
[{'index': 0,
'host_name': 'localhost',
'alias': 'localhost',
'display_name': 'localhost',
'address': '127.0.0.1',
'object_id': '150',
'host_object_id': '150',
'is_active': '1'},
[…]
]
In [4]:
At the time of writing, this is the list of functions you can use within the NAGIOSClient class:
Using this class, you will be able to create a new host directly into Nagios. Here is how to proceed:
In [12]: host = NAGIOSSensor(name="L45R10", ipaddr="10.48.1.1", site="45 Ballpark")
In [13]: host.status
Out[13]: "created: {'success': 'Added L45R10 to the system. Config applied, Nagios Core was restarted.'}"
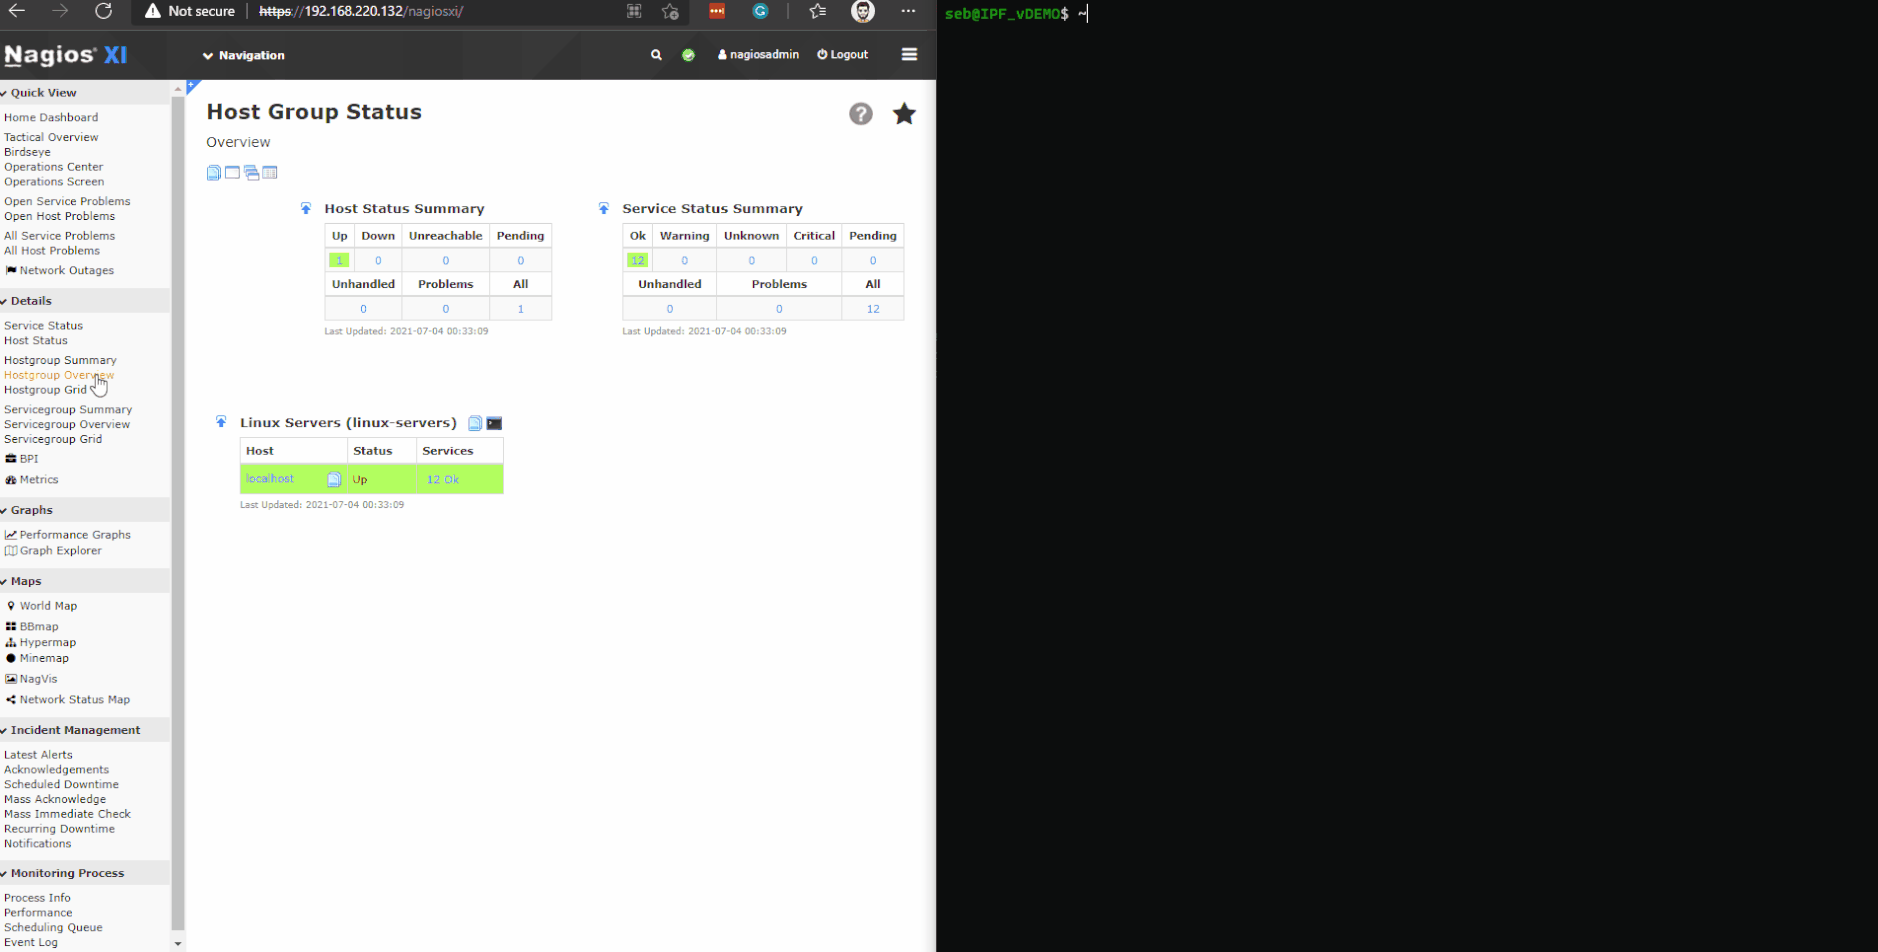
If you look at Nagios, you will now see under Hostgroup Overview the recently created host L45R10, inside the hostgroup “45 Ballpark”

This is brilliant, we can now interact with the API for IP Fabric and Nagios. In the next section we will see how we can use this to automatically populate devices in Nagios based on the information collected by IP Fabri
In this part, we are going to take, for example, the following situation: you have decided to replace your previous monitoring system with Nagios, and you want to ensure all devices will be correctly added. How can you proceed?
You are about to witness how short the code to execute this is!
"""
Script to show simple use of ipf_api_client and nagios_api_client
"""
from ipf.ipf_api_client import IPFClient
from nagios.nagios_api_client import NAGIOSHost
def main():
#creation of the IPFClient
ipf = IPFClient()
# collect all devices from IP Fabric using the filter
site_filter = {"siteName": ["like", "45"]}
devices = ipf.device_list(filters=site_filter)
# now we create in Nagios each device
for device in devices:
print(
f" -- Adding device '{device['hostname']}' in site '{device['siteName']}'"
)
NAGIOSHost(name=device["hostname"], ipaddr=device["loginIp"], site=device["siteName"])
print(
f"Job completed! {len(devices)} devices were added to hostgroup '{devices[0]['siteName']}'"
)
if __name__ == "__main__":
main()
Please ensure you have created the environment variable as mentioned previously in this blog:
seb@IPF_vDEMO$ export IPF_URL="https://ipfabric.server/"
seb@IPF_vDEMO$ export IPF_TOKEN="123qwe45ert67tyui"
seb@IPF_vDEMO$ export NAGIOS_URL="https://nagios.server"
seb@IPF_vDEMO$ export NAGIOS_TOKEN="0987lkj76uyt54fds"
An easy way to create the filter is to follow these steps:
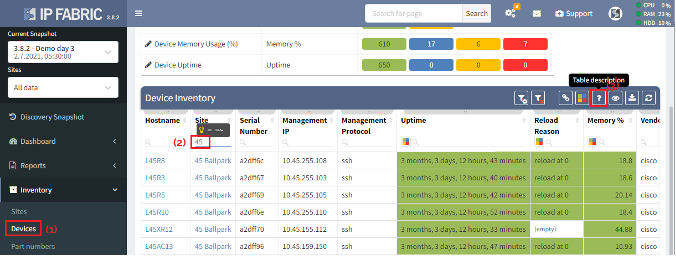
1 - Go to Inventory/Devices
2 - Use any filter to get the list of devices you want to add into Nagios
3 - Click on the question mark “Table description”
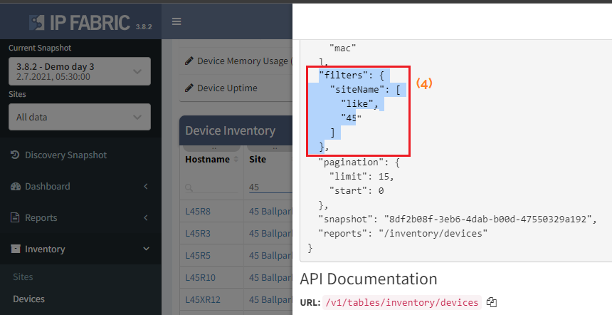
4 - In the payload, find the “filters”, use this to create the variable filters in the python script. In our situation it becomes:
filters = {"siteName": ["like", "45"]}
You can learn more at www.ipfabric.io and also follow our company’s LinkedIn page or Blog, where we continually post new content.
For more information regarding existing and on-going integrations, join us on IP Fabric Community Slack.
In this blog post we are going to show you how we can use the API Clients created for IP Fabric and NAGIOS. We are going to work on a simple scenario where we want to create hosts discovered by IP Fabric into NAGIOS XI.
There are already a few blogs on how to use IP Fabric’s API, so today we’re going to focus on using the API clients, which have been created to simplify interaction and data collection.
First, you need to download the code in our GitLab repository: 2021-08-30-ipfabric-nagios-api-integration using your preferred method:
Cloning:
Download:
Inside the api_clients folder, you will see the existing API clients. We will have a look at ipf and nagios, to understand how to use them.
seb@IPF_vDEMO$ git clone https://gitlab.com/ip-fabric/integrations/marketing-examples.git
Cloning into 'integration-demos'…
[…]
Resolving deltas: 100% (32/32), done.
seb@IPF_vDEMO$ cd integration-demos/api_clients/
seb@IPF_vDEMO$
Before looking at each API client, we need to define some requirements to ensure everything will work as expected.
For this blog post, I will be using iPython for its powerful interactive shell, but you can use Python3. To use the Nagios and IPF api client, you need to install the HTTPX library, and we would recommend using the rich library as well.
How to install iPython:
seb@IPF_vDEMO$ pip install ipython
How to install httpx and rich libraries:
seb@IPF_vDEMO$ pip install httpx rich
To start using the API Client, you need to provide the information regarding the IP Fabric server and the token.
To create the token on IP Fabric, go to Settings/API Tokens and create a new token:
You need to create environment variables:
seb@IPF_vDEMO$ export IPF_URL="https://ipfabric.server/"
seb@IPF_vDEMO$ export IPF_TOKEN="123qwe45ert67tyui"
We can now run ipython to create the IP Fabric client:
seb@IPF_vDEMO$ ipython
Python 3.8.5 (default, May 27 2021, 13:30:53)
Type 'copyright', 'credits' or 'license' for more information
IPython 7.25.0 -- An enhanced Interactive Python. Type '?' for help.
Let’s explore the IPFClient class, which will interact with the IP Fabric server.
In [1]: from ipf.ipf_api_client import IPFClient, IPFDevice
In [2]: from rich import print
In [3]: ipf=IPFClient()
The Class ipf will be created using the environment variables you created above. To confirm it has worked correctly, you can look at the list of snapshots. This will confirm that we have access to the data from the IP Fabric server:
In [5]: ipf.snapshot_list()
Out[5]:
[{'index': 0,
'id': '50ac77c2-8be4-495b-b0ef-ea2a75bfa21c',
'name': None,
'count': 682,
'state': 'loaded'},
[…]
{'index': 18,
'id': 'e9a5504b-1592-4c74-a84f-5188f99a9283',
'name': 'Demo day 1 - 202106 (clone)',
'count': 678,
'state': 'unloaded'}]
In [6]:
At the time of writing, this is the list of functions you can use within the IPFClient class:
You can now assign a device to a variable which will allow you to access information for that specific device (IP address, hostname, site…)
In [6]: d = IPFDevice("L38EXR1")
In [7]: print(d.hostname+"|"+d.ipaddr)
L38EXR1|10.38.255.101
This concludes the overview of the IPF API client. Before showing a more specific example on how to use it, we will look at the Nagios XI API client.
Just like we did with IP Fabric, we need to ensure we have a valid token to use the Nagios XI API. To proceed, you need to go to your account setting (1) and generate an API key (2):
You also need to create the environment variables related to Nagios:
seb@IPF_vDEMO$ export NAGIOS_URL="https://nagios.server"
seb@IPF_vDEMO$ export NAGIOS_TOKEN="0987lkj76uyt54fds"
We can now run ipython to create the NAGIOS XI API client:
seb@IPF_vDEMO$ ipython
Python 3.8.5 (default, May 27 2021, 13:30:53)
Type 'copyright', 'credits' or 'license' for more information
IPython 7.25.0 -- An enhanced Interactive Python. Type '?' for help.
Let’s explore the NAGIOSClient class, which will interact with the NAGIOS server.
In [1]: from ipf.ipf_api_client import IPFDevice, IPFClient
...: from nagios.nagios_api_client import NAGIOSSensor, NAGIOSClient
In [2]: nagios = NAGIOSClient()
The Class nagios will be created using the environment variables you created above. To confirm it has worked correctly, you can look at the list of existing hosts. This will confirm that we have access to Nagios’ data:
In [3]: nagios.host_list()
Out[3]:
[{'index': 0,
'host_name': 'localhost',
'alias': 'localhost',
'display_name': 'localhost',
'address': '127.0.0.1',
'object_id': '150',
'host_object_id': '150',
'is_active': '1'},
[…]
]
In [4]:
At the time of writing, this is the list of functions you can use within the NAGIOSClient class:
Using this class, you will be able to create a new host directly into Nagios. Here is how to proceed:
In [12]: host = NAGIOSSensor(name="L45R10", ipaddr="10.48.1.1", site="45 Ballpark")
In [13]: host.status
Out[13]: "created: {'success': 'Added L45R10 to the system. Config applied, Nagios Core was restarted.'}"
If you look at Nagios, you will now see under Hostgroup Overview the recently created host L45R10, inside the hostgroup “45 Ballpark”
This is brilliant, we can now interact with the API for IP Fabric and Nagios. In the next section we will see how we can use this to automatically populate devices in Nagios based on the information collected by IP Fabri
In this part, we are going to take, for example, the following situation: you have decided to replace your previous monitoring system with Nagios, and you want to ensure all devices will be correctly added. How can you proceed?
You are about to witness how short the code to execute this is!
"""
Script to show simple use of ipf_api_client and nagios_api_client
"""
from ipf.ipf_api_client import IPFClient
from nagios.nagios_api_client import NAGIOSHost
def main():
#creation of the IPFClient
ipf = IPFClient()
# collect all devices from IP Fabric using the filter
site_filter = {"siteName": ["like", "45"]}
devices = ipf.device_list(filters=site_filter)
# now we create in Nagios each device
for device in devices:
print(
f" -- Adding device '{device['hostname']}' in site '{device['siteName']}'"
)
NAGIOSHost(name=device["hostname"], ipaddr=device["loginIp"], site=device["siteName"])
print(
f"Job completed! {len(devices)} devices were added to hostgroup '{devices[0]['siteName']}'"
)
if __name__ == "__main__":
main()
Please ensure you have created the environment variable as mentioned previously in this blog:
seb@IPF_vDEMO$ export IPF_URL="https://ipfabric.server/"
seb@IPF_vDEMO$ export IPF_TOKEN="123qwe45ert67tyui"
seb@IPF_vDEMO$ export NAGIOS_URL="https://nagios.server"
seb@IPF_vDEMO$ export NAGIOS_TOKEN="0987lkj76uyt54fds"
An easy way to create the filter is to follow these steps:
1 - Go to Inventory/Devices
2 - Use any filter to get the list of devices you want to add into Nagios
3 - Click on the question mark “Table description”
4 - In the payload, find the “filters”, use this to create the variable filters in the python script. In our situation it becomes:
filters = {"siteName": ["like", "45"]}
You can learn more at www.ipfabric.io and also follow our company’s LinkedIn page or Blog, where we continually post new content.
For more information regarding existing and on-going integrations, join us on IP Fabric Community Slack.


seb@IPF_vDEMO$ git clone https://gitlab.com/ip-fabric/integrations/marketing-examples.git
Cloning into 'integration-demos'…
[…]
Resolving deltas: 100% (32/32), done.
seb@IPF_vDEMO$ cd integration-demos/api_clients/
seb@IPF_vDEMO$