My fellow Solution Architect, Justin, stated in his blog post about API Programmability that
One of the most difficult parts in a Network Automation journey is collecting the data you need.
and that
IP Fabric extracts your important network data directly from the devices and places it in our vendor-neutral data models which remove this parsing burden from your development teams.
We are now pleased to announce the release of our IP Fabric Ansible collection to allow network professionals to get the information they need into one of the most popular network automation frameworks available.
So, what is an Ansible collection? Ansible collections are a distribution format for Ansible content. It is a way to package and distribute Ansible roles, modules, and plugins as a single archive file. A collection can include multiple roles, modules, and plugins and can be used to organize and distribute related content together. One of the main benefits of collections is their ability to be shared and reused across multiple projects.
Our collection is currently hosted on our GitLab, distributed through Ansible Galaxy and contains the following:
Find our full collection documentation here.
Before the Ansible collection can be used there are some basics that need to have to get going:
pip3 install ipfabricpip3 install ansibleOnce the pre-requisites are installed the Ansible collection can be installed on the command line by using the following command: ansible-galaxy collection install community_fabric.ansible.
Ansible dynamic inventory is a feature that allows Ansible to automatically discover and manage hosts in a dynamic environment. Instead of specifying the hosts to be managed in a static inventory file, a dynamic inventory retrieves the host information from an external source, in our case, it's IP Fabric.
There can be several benefits to dynamic inventories over static inventories:
plugin: community_fabric.ansible.inventory
provider:
  base_url: https://<url>
  token: <token>
compose:
  ansible_network_os: family
keyed_groups:
  - key: family
    prefix: ""
    separator: ""
The file above if saved as ipf_inventory.yml upon execution will query IP Fabric and as a result return a list of hosts with information IP Fabric has provided such as site name, uptime etc. The highlighted code in red will create a dynamic variable for each host called ansible_network_os which is the value of the key family returned from IP Fabric. The section highlighted in orange will group devices based on their device families such as eos, ios and junos. More parameters are available and they can be found in the documentation.
Ansible modules are pre-written scripts that can be used to perform specific tasks on managed hosts. They are written in Python and can be used to perform tasks such as installing software and configuring network devices. Ansible modules can be used in playbooks, which are written in YAML and describe a set of tasks to be executed on managed hosts.
In the initial release of the Ansible collection, there are three modules, snapshot_info, snapshot and table_info. Let's take a look at each of these modules and see what they do.
snapshot_infoThis module is intended to gather snapshot information from IP Fabric such as the name, ID, how many devices are in the snapshot and much more.
- name: Snapshot Info
  community_fabric.ansible.snapshot_info:
    provider:
      base_url: https://<url>
      token: <token>
    snapshot_id:
The above task shows how to use this module within a playbook. The provider information contains how to connect to the IP Fabric API but this can be achieved with environment variables. Going forward I will exclude the provider parameter from the examples. The last parameter is snapshot_id, this is an optional parameter that if not used will return a list of loaded/unloaded snapshots to the user. If the snapshot_id is specified then only one snapshot will be returned.
snapshotThe snapshot module allows snapshots to be manipulated from within Ansible. Everything from starting a discovery to deleting a snapshot can be done with this module.
- name: Start Snapshot (state=present)
  community_fabric.ansible.snapshot:

- name: Delete Snapshot
  community_fabric.ansible.snapshot:
    snaphot_id: 12dd8c61-129c-431a-b98b-4c9211571f89
    state: absent

- name: Unload Snapshot
  community_fabric.ansible.snapshot:
    snaphot_id: 12dd8c61-129c-431a-b98b-4c9211571f89
    state: unload

- name: Clone Snapshot
  community_fabric.ansible.snapshot:
    snaphot_id: 12dd8c61-129c-431a-b98b-4c9211571f89
    state: clone

- name: Clone Snapshot
  community_fabric.ansible.snapshot:
    snaphot_id: 12dd8c61-129c-431a-b98b-4c9211571f89
    devices:
      - 9AMSST2E75V
    state: rediscover
There are currently eight states that the snapshot module can have each performing a different function.
| State | Description |
present | present is the default state it will start a new discovery with the global settings. If the snapshot_id parameter is present with snapshot_name and snapshot_note it will edit a snapshot to contain specific name and note. |
absent | Absent will delete a snapshot when the snapshot_id parameter is present. |
load/unload | This state will unload or load a specific snapshot when the snapshot_id is present. |
lock/unlock | This state will unlock or lock a specific snapshot when the snapshot_id is present. |
clone | When the snapshot_id is specified it will clone the snapshot and load it. |
rediscover | Rediscover allows a list of device serial numbers to be specified in the devices parameter which will be rediscovered in the specified snapshot with snapshot_id. |
table_infoThe table_info module allows Ansible users to gather data from all IP Fabric tables such as NTP Summary, VRF Interfaces, Port Channels and many more. We want our IP Fabric users to get as much of the information we provide into the tools that they love and this module is great for that.
- name: Snapshot Info
community_fabric.ansible.table_info:
# snapshot_id:
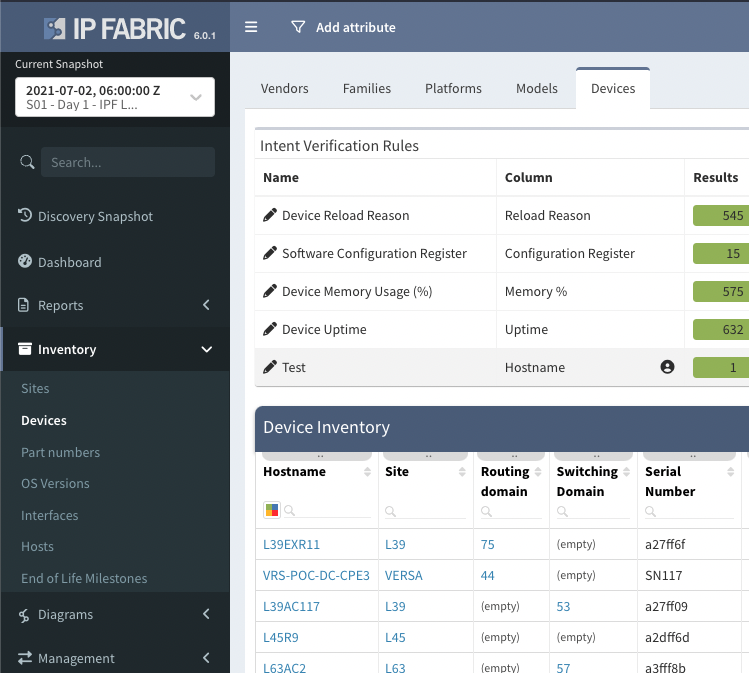
technology: inventory
table: devicesThis module has three key parameters technology, table and snapshot_id. The technology parameter allows a user to specify what area of IP Fabric to gather the information from each technology that has a corresponding table. The example above shows the technology inventory with the table of devices this corresponds to our UI as we can find the devices table within the inventory menu item within our product. If snapshot_id is not specified the latest loaded snapshot will be used.
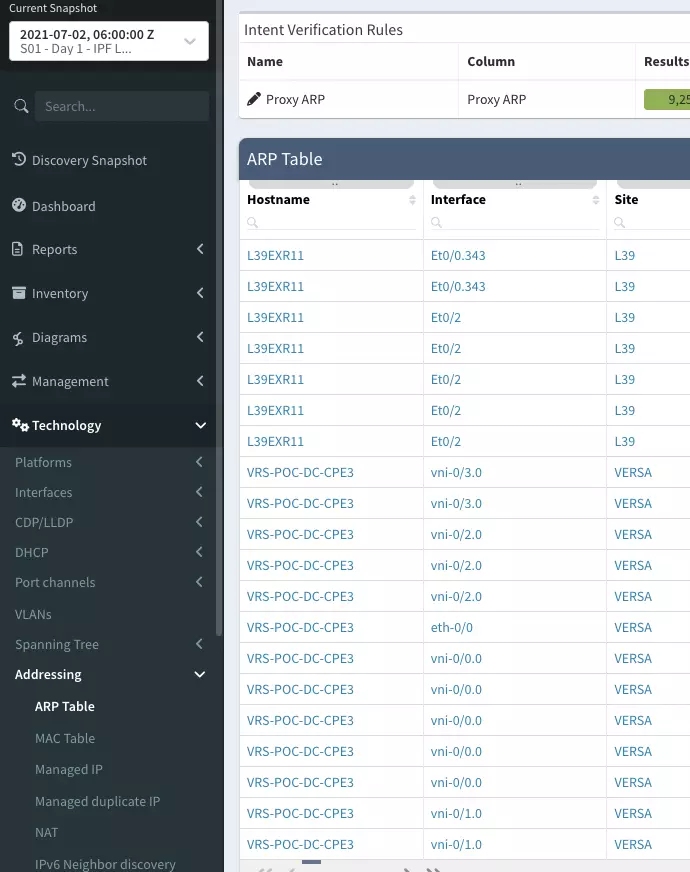
Let's provide another example - say we want to return the ARP table we can use the technology of 'addressing' and the table of 'arp_table'. A full list of available technologies and tables can be found in the module documentation.
- name: Find IP address belonging to a MAC address
  community_fabric.ansible.table_info:
    # snapshot_id:
    technology: addressing
    table: arp_table
    filter:
      mac:
        - like
        - 5254.00d3.45c5
    columns:
      - hostname
      - intName
      - ip
      - mac
As we can see, we are gathering the ARP table from IP Fabric. However, we have highlighted some new parameters that could be used within this module. In red we have a filter this allows users to add as many filters required to the API query into IP Fabric as they need. This example only returns ARP entries that have a specific MAC address. The columns parameter in orange allows the user to specify columns to be returned by the module to make the returned response more concise.
The final example shows how to use the table_info module to return information from IP Fabric that has failed an Intent Verification Rule.
- name: Filter and noncompliant NTP configurations
  community_fabric.ansible.table_info:
    # snapshot_id:
    technology: management
    table: ntp_summary
    filter: {sources: ["color", "eq", "30"]}
    report: /technology/management/ntp/summary
  register: ntp_summary
Using the filter and the report parameter allows tables to be returned with specific Intent Verification Rules selected. This can be very useful for Ansible users as we can use this information to auto-remediate any configuration discrepancies (as I will demonstrate shortly).
Ansible lookup plugins allow Ansible to access data from external sources, such as data stored in a file, a database, or a web service. These plugins are called during task execution to retrieve data that can be used to dynamically construct tasks, such as generating a list of hosts to target for a specific operation. Lookup plugins can be used in conjunction with other Ansible modules to retrieve and manipulate data as part of a playbook.
table_infoThe table_info lookup plugin is the same as the table_info module shown above. The plugin allows you to perform the query within different areas of a playbook, such as a template or a string as part of a module. The following code is the same query as the last within the debug module. See the documentation for more information.
- name: Check non-compliant devices
  debug:
    msg: "Number of non-compliant devices: {{ lookup('community_fabric.ansible.table_info', 'management', 'ntp_summary', filter={'sources': ['color', 'eq', '30']}, report='/technology/management/ntp/summary', base_url=provider.base_url, token=provider.token, verify=False, snapshot_id=new_snapshot.data.id) | length }}"
  delegate_to: localhost
  run_once: true

## output example
localhost: Number of non-compliant devices: 24Now that we have had a brief overview of all the components, plugins, and modules available in the Ansible Collection, let's see how we can use them in practice.
---
- hosts: all
  gather_facts: False

  tasks:
    - name: Filter and select columns on technology table
      community_fabric.ansible.table_info:
        provider: "{{ provider }}"
        # snapshot_id: 07b338d0-4cc1-48e9-a99d-12ce100b0bb8
        technology: management
        table: ntp_summary
        filter: {sources: ["color", "eq", "30"]}
        report: /technology/management/ntp/summary
      delegate_to: localhost
      run_once: true
      register: NTP_DATA

    - debug:
        msg: "Number of non-compliant devices: {{ NTP_DATA.data | length }}"
      delegate_to: localhost
      run_once: true

    - name: Configure Junos NTP
      junipernetworks.junos.junos_ntp_global:
        config:
          servers: "{{ ntp.servers }}"
        state: overridden
      when: ansible_network_os == 'junos'

    - name: Configure EOS NTP
      arista.eos.eos_ntp_global:
        config:
          servers:
            - server: "{{ ntp_server }}"
        state: overridden
      when: (ansible_network_os == 'eos') and (item.hostname == hostvars[inventory_hostname]['hostname'])
      loop: "{{ NTP_DATA.data }}"

    - name: Configure IOS NTP
      cisco.ios.ios_ntp_global:
        config:
          servers:
            - server: "{{ ntp_server }}"
              vrf: MGMT
        state: overridden
      when: (ansible_network_os == 'ios') and (item.hostname == hostvars[inventory_hostname]['hostname'])
      loop: "{{ NTP_DATA.data }}"

    - name: Start Snapshot
      community_fabric.ansible.snapshot:
        provider: "{{ provider }}"
      delegate_to: localhost
      run_once: true
      register: new_snapshot

    - name: check snapshot
      community_fabric.ansible.snapshot_info:
        provider: "{{ provider }}"
        snapshot_id: "{{ new_snapshot.data.id }}"
      register: result
      until: result.data.status == 'done'
      retries: 20
      delay: 30
      delegate_to: localhost
      run_once: true

- name: Check non-compliant devices
  debug:
    msg: "Number of non-compliant devices: {{ lookup('community_fabric.ansible.table_info', 'management', 'ntp_summary', filter={'sources': ['color', 'eq', '30']}, report='/technology/management/ntp/summary', base_url=provider.base_url, token=provider.token, verify=False, snapshot_id=new_snapshot.data.id) | length }}"
  delegate_to: localhost
  run_once: true
The code above is very primitive, but it allows for the auto-remediation of NTP via IP Fabric and Ansible. Firstly, the playbook uses the dynamic inventory when running this playbook against all hosts. The first task we have seen before collects the number of non-compliant devices with NTP incorrectly configured this is saved to the NTP_DATA variable. The second task is a debug that shows the number of non-compliant devices to the user.
The configure statements for junos, ios and eos loop over the data within the NTP response and only configure the correct NTP server if the conditionals are met. These conditionals first check that the current host is a junos, ios or eos device, and the second check makes sure that the hostname of the current device matches the hostname from the NTP output from IP Fabric. The device can be configured with the correct NTP server. if these are both correct. Once the configuration is complete, Ansible will start a new snapshot of the network. It will wait for the snapshot to be completed until we check the non-compliant devices again using the lookup command.
The command to execute this playbook would look like the following:
ansible-playbook -i ipf_inventory.yml pb.4.fix-ntp.yml
My fellow Solution Architect, Justin, stated in his blog post about API Programmability that
One of the most difficult parts in a Network Automation journey is collecting the data you need.
and that
IP Fabric extracts your important network data directly from the devices and places it in our vendor-neutral data models which remove this parsing burden from your development teams.
We are now pleased to announce the release of our IP Fabric Ansible collection to allow network professionals to get the information they need into one of the most popular network automation frameworks available.
So, what is an Ansible collection? Ansible collections are a distribution format for Ansible content. It is a way to package and distribute Ansible roles, modules, and plugins as a single archive file. A collection can include multiple roles, modules, and plugins and can be used to organize and distribute related content together. One of the main benefits of collections is their ability to be shared and reused across multiple projects.
Our collection is currently hosted on our GitLab, distributed through Ansible Galaxy and contains the following:
Find our full collection documentation here.
Before the Ansible collection can be used there are some basics that need to have to get going:
pip3 install ipfabricpip3 install ansibleOnce the pre-requisites are installed the Ansible collection can be installed on the command line by using the following command: ansible-galaxy collection install community_fabric.ansible.
Ansible dynamic inventory is a feature that allows Ansible to automatically discover and manage hosts in a dynamic environment. Instead of specifying the hosts to be managed in a static inventory file, a dynamic inventory retrieves the host information from an external source, in our case, it's IP Fabric.
There can be several benefits to dynamic inventories over static inventories:
plugin: community_fabric.ansible.inventory
provider:
  base_url: https://<url>
  token: <token>
compose:
  ansible_network_os: family
keyed_groups:
  - key: family
    prefix: ""
    separator: ""
The file above if saved as ipf_inventory.yml upon execution will query IP Fabric and as a result return a list of hosts with information IP Fabric has provided such as site name, uptime etc. The highlighted code in red will create a dynamic variable for each host called ansible_network_os which is the value of the key family returned from IP Fabric. The section highlighted in orange will group devices based on their device families such as eos, ios and junos. More parameters are available and they can be found in the documentation.
Ansible modules are pre-written scripts that can be used to perform specific tasks on managed hosts. They are written in Python and can be used to perform tasks such as installing software and configuring network devices. Ansible modules can be used in playbooks, which are written in YAML and describe a set of tasks to be executed on managed hosts.
In the initial release of the Ansible collection, there are three modules, snapshot_info, snapshot and table_info. Let's take a look at each of these modules and see what they do.
snapshot_infoThis module is intended to gather snapshot information from IP Fabric such as the name, ID, how many devices are in the snapshot and much more.
- name: Snapshot Info
  community_fabric.ansible.snapshot_info:
    provider:
      base_url: https://<url>
      token: <token>
    snapshot_id:
The above task shows how to use this module within a playbook. The provider information contains how to connect to the IP Fabric API but this can be achieved with environment variables. Going forward I will exclude the provider parameter from the examples. The last parameter is snapshot_id, this is an optional parameter that if not used will return a list of loaded/unloaded snapshots to the user. If the snapshot_id is specified then only one snapshot will be returned.
snapshotThe snapshot module allows snapshots to be manipulated from within Ansible. Everything from starting a discovery to deleting a snapshot can be done with this module.
- name: Start Snapshot (state=present)
  community_fabric.ansible.snapshot:

- name: Delete Snapshot
  community_fabric.ansible.snapshot:
    snaphot_id: 12dd8c61-129c-431a-b98b-4c9211571f89
    state: absent

- name: Unload Snapshot
  community_fabric.ansible.snapshot:
    snaphot_id: 12dd8c61-129c-431a-b98b-4c9211571f89
    state: unload

- name: Clone Snapshot
  community_fabric.ansible.snapshot:
    snaphot_id: 12dd8c61-129c-431a-b98b-4c9211571f89
    state: clone

- name: Clone Snapshot
  community_fabric.ansible.snapshot:
    snaphot_id: 12dd8c61-129c-431a-b98b-4c9211571f89
    devices:
      - 9AMSST2E75V
    state: rediscover
There are currently eight states that the snapshot module can have each performing a different function.
| State | Description |
present | present is the default state it will start a new discovery with the global settings. If the snapshot_id parameter is present with snapshot_name and snapshot_note it will edit a snapshot to contain specific name and note. |
absent | Absent will delete a snapshot when the snapshot_id parameter is present. |
load/unload | This state will unload or load a specific snapshot when the snapshot_id is present. |
lock/unlock | This state will unlock or lock a specific snapshot when the snapshot_id is present. |
clone | When the snapshot_id is specified it will clone the snapshot and load it. |
rediscover | Rediscover allows a list of device serial numbers to be specified in the devices parameter which will be rediscovered in the specified snapshot with snapshot_id. |
table_infoThe table_info module allows Ansible users to gather data from all IP Fabric tables such as NTP Summary, VRF Interfaces, Port Channels and many more. We want our IP Fabric users to get as much of the information we provide into the tools that they love and this module is great for that.
- name: Snapshot Info
  community_fabric.ansible.table_info:
    # snapshot_id:
    technology: inventory
    table: devices
This module has three key parameters technology, table and snapshot_id. The technology parameter allows a user to specify what area of IP Fabric to gather the information from each technology that has a corresponding table. The example above shows the technology inventory with the table of devices this corresponds to our UI as we can find the devices table within the inventory menu item within our product. If snapshot_id is not specified the latest loaded snapshot will be used.
Let's provide another example - say we want to return the ARP table we can use the technology of 'addressing' and the table of 'arp_table'. A full list of available technologies and tables can be found in the module documentation.
- name: Find IP address belonging to a MAC address
  community_fabric.ansible.table_info:
    # snapshot_id:
    technology: addressing
    table: arp_table
    filter:
      mac:
        - like
        - 5254.00d3.45c5
    columns:
      - hostname
      - intName
      - ip
      - mac
As we can see, we are gathering the ARP table from IP Fabric. However, we have highlighted some new parameters that could be used within this module. In red we have a filter this allows users to add as many filters required to the API query into IP Fabric as they need. This example only returns ARP entries that have a specific MAC address. The columns parameter in orange allows the user to specify columns to be returned by the module to make the returned response more concise.
The final example shows how to use the table_info module to return information from IP Fabric that has failed an Intent Verification Rule.
- name: Filter and noncompliant NTP configurations
  community_fabric.ansible.table_info:
    # snapshot_id:
    technology: management
    table: ntp_summary
    filter: {sources: ["color", "eq", "30"]}
    report: /technology/management/ntp/summary
  register: ntp_summary
Using the filter and the report parameter allows tables to be returned with specific Intent Verification Rules selected. This can be very useful for Ansible users as we can use this information to auto-remediate any configuration discrepancies (as I will demonstrate shortly).
Ansible lookup plugins allow Ansible to access data from external sources, such as data stored in a file, a database, or a web service. These plugins are called during task execution to retrieve data that can be used to dynamically construct tasks, such as generating a list of hosts to target for a specific operation. Lookup plugins can be used in conjunction with other Ansible modules to retrieve and manipulate data as part of a playbook.
table_infoThe table_info lookup plugin is the same as the table_info module shown above. The plugin allows you to perform the query within different areas of a playbook, such as a template or a string as part of a module. The following code is the same query as the last within the debug module. See the documentation for more information.
- name: Check non-compliant devices
  debug:
    msg: "Number of non-compliant devices: {{ lookup('community_fabric.ansible.table_info', 'management', 'ntp_summary', filter={'sources': ['color', 'eq', '30']}, report='/technology/management/ntp/summary', base_url=provider.base_url, token=provider.token, verify=False, snapshot_id=new_snapshot.data.id) | length }}"
  delegate_to: localhost
  run_once: true

## output example
localhost: Number of non-compliant devices: 24Now that we have had a brief overview of all the components, plugins, and modules available in the Ansible Collection, let's see how we can use them in practice.
---
- hosts: all
  gather_facts: False

  tasks:
    - name: Filter and select columns on technology table
      community_fabric.ansible.table_info:
        provider: "{{ provider }}"
        # snapshot_id: 07b338d0-4cc1-48e9-a99d-12ce100b0bb8
        technology: management
        table: ntp_summary
        filter: {sources: ["color", "eq", "30"]}
        report: /technology/management/ntp/summary
      delegate_to: localhost
      run_once: true
      register: NTP_DATA

    - debug:
        msg: "Number of non-compliant devices: {{ NTP_DATA.data | length }}"
      delegate_to: localhost
      run_once: true

    - name: Configure Junos NTP
      junipernetworks.junos.junos_ntp_global:
        config:
          servers: "{{ ntp.servers }}"
        state: overridden
      when: ansible_network_os == 'junos'

    - name: Configure EOS NTP
      arista.eos.eos_ntp_global:
        config:
          servers:
            - server: "{{ ntp_server }}"
        state: overridden
      when: (ansible_network_os == 'eos') and (item.hostname == hostvars[inventory_hostname]['hostname'])
      loop: "{{ NTP_DATA.data }}"

    - name: Configure IOS NTP
      cisco.ios.ios_ntp_global:
        config:
          servers:
            - server: "{{ ntp_server }}"
              vrf: MGMT
        state: overridden
      when: (ansible_network_os == 'ios') and (item.hostname == hostvars[inventory_hostname]['hostname'])
      loop: "{{ NTP_DATA.data }}"

    - name: Start Snapshot
      community_fabric.ansible.snapshot:
        provider: "{{ provider }}"
      delegate_to: localhost
      run_once: true
      register: new_snapshot

    - name: check snapshot
      community_fabric.ansible.snapshot_info:
        provider: "{{ provider }}"
        snapshot_id: "{{ new_snapshot.data.id }}"
      register: result
      until: result.data.status == 'done'
      retries: 20
      delay: 30
      delegate_to: localhost
      run_once: true

- name: Check non-compliant devices
  debug:
    msg: "Number of non-compliant devices: {{ lookup('community_fabric.ansible.table_info', 'management', 'ntp_summary', filter={'sources': ['color', 'eq', '30']}, report='/technology/management/ntp/summary', base_url=provider.base_url, token=provider.token, verify=False, snapshot_id=new_snapshot.data.id) | length }}"
  delegate_to: localhost
  run_once: true
The code above is very primitive, but it allows for the auto-remediation of NTP via IP Fabric and Ansible. Firstly, the playbook uses the dynamic inventory when running this playbook against all hosts. The first task we have seen before collects the number of non-compliant devices with NTP incorrectly configured this is saved to the NTP_DATA variable. The second task is a debug that shows the number of non-compliant devices to the user.
The configure statements for junos, ios and eos loop over the data within the NTP response and only configure the correct NTP server if the conditionals are met. These conditionals first check that the current host is a junos, ios or eos device, and the second check makes sure that the hostname of the current device matches the hostname from the NTP output from IP Fabric. The device can be configured with the correct NTP server. if these are both correct. Once the configuration is complete, Ansible will start a new snapshot of the network. It will wait for the snapshot to be completed until we check the non-compliant devices again using the lookup command.
The command to execute this playbook would look like the following:
ansible-playbook -i ipf_inventory.yml pb.4.fix-ntp.yml